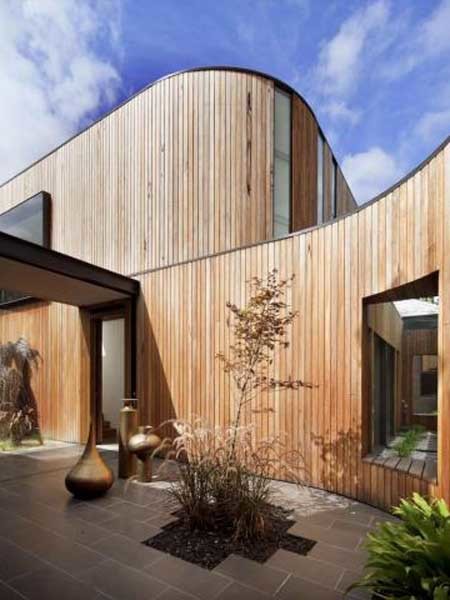
Using Radial Shiplap vertically on a curve can be a great way to add a decorative and unique touch to a construction project whilst showcasing the versatility of timber. Durable solid timber shiplap in a tongue & grooved interlocking (secret fix) or an unseasoned, rough sawn board and batten option can be a wise choice when a desired convex curved wall is the sought after look.
Steps and considerations before installation:
Stud placement: Begin by positioning the studs on the desired curvature of the wall, this will provide the framework for attaching the shiplap and achieving the desired curvature.
Breathable Sarking: Install an appropriate breathable sarking as additional layer of protection that shields the timber frame from water related weather damage, allowing moisture to escape the inside of the structure.
Fixing points: Use three 12mm built up layered strips of suitable marine grade plywood or similar treated timber that allows for flexibility, durability and also creates a breathable cavity. These strips should be spaced at 450mm centres and be fastened to the stud wall. The shiplap should then be fixed to the plywood strips. This allows for proper ventilation of any built up condensation on the reverse side of the shiplap and aids in drying excess moisture within the wall assembly.


Radius: The radius of the curve will determine the appropriate board size, estimate guide:
38mm Shiplap = 350mm Radius Min
70mm Shiplap = 700mm Radius Min
90mm Shiplap = 900mm Radius Min
110-120mm Shiplap = 1200mm Radius Min
Board and Batten cladding = 900mm Radius Min
The tighter the radius the more chance of weather and water ingress, gradual curves will always perform better.
Further
points to Consider:
·
The
direction of prevailing weather should determine the direction of your
cladding. Grooves should be directed away from the weather to minimise water
entry.
·
An
extra face fixed screw (on shiplap cladding) is recommended to minimise the lip
from cupping on exposed curved walls.
·
Extra
movement and cupping is a possibility and should be expected on exposed walls
due to the weather and angle of cladding.
·
Protecting
curves with eaves or installing on walls in less exposed areas is recommended.
If a wall is fully exposed on a direction where the weather is particularly
damaging, a curve is probably not the right choice.
·
Pre-oiling timber prior to installation on all
four sides is recommended as it helps to create a protective barrier to protect
the timber from moisture and prolong its durability. All end cuts should be sealed see
installation guides for more information on finishing.

Moisture ingress and leaks into the home is the main cause of premature degradation of timber cladding and damage to the home. Designing for durability and proper installation is paramount and care must be taken throughout each stage of the build to ensure the home is protected from the harsh Australian weather for years to come.
All information is for guidance only and it is the responsibility of the installer to assure compliance in accordance to the Australian Standards and current National Construction Code. Refer to Installation guides of selected products for more information.